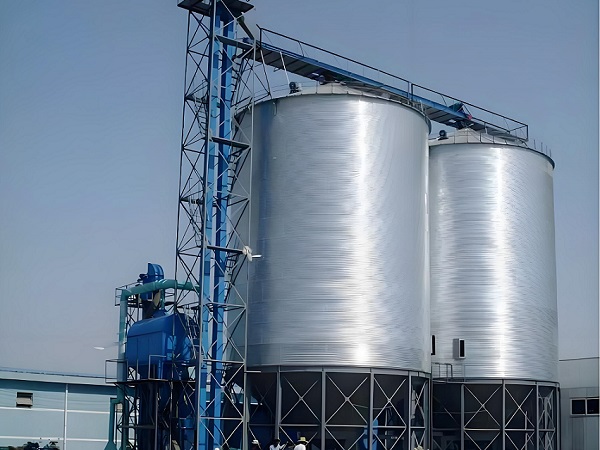
This article, from the perspective of actual engineering installation, systematically introduces the installation process and core precautions of flat-bottom steel silos, for the reference of overseas customers and project parties. This guide is highly recommended for our flagship COBAN 10,000 Bushel (280 MT) Intelligent Grain Bin, which is optimized for quick and safe assembly.

Part One: Preparations Before Installation
1.1 Tool Preparation
Before the formal installation, complete installation tools should be configured according to the warehouse type and construction scale. It mainly includes different specifications of pins, electric wrenches, socket combinations, common hand tools, electric tools and lifting equipment. The electric wrench should cover the torque range of M6 to M20 bolts to ensure that the bolts are tightened in compliance with technical requirements. The hoisting frame, steel wire rope and hand chain hoist are the core equipment for lifting the warehouse. Their safety conditions need to be checked in advance.
1.2 Preparation of standard parts and Accessories
All bolts, nuts, spherical washers and rubber and plastic gaskets should be counted one by one according to the shipping list. Approximately 85% of M10 specification bolts need to be pre-fitted with spherical washers and rubber-plastic washers, mainly used at the connection points between the silo top and the silo cylinder. At the same time, it should be confirmed that the quantity of sealing mortar strips is sufficient to meet the sealing requirements of the vertical joints and key nodes of the enclosure panels.
1.3 Components and Installation Preparation
Before installation, the top components of the warehouse, the first layer of the panel and the first section of the column should be transported to the construction site. Set up a center support for the silo top at the center of the foundation to temporarily support the silo top ring. The height of the support should be determined based on the type of silo. When the height from the silo top circle to the foundation is relatively low, it may not be set. The form of the top of the support is not limited, but it is necessary to ensure that the top ring of the warehouse is placed stably.

Part Two: Installation of the silo top Section (25° slotted silo top)
2.1 Installation of the first floor panel and the first column section
The first layer of the partition board is the top layer of the partition board. When the panel is vertically connected, sealing putty should be pasted on one side. The putty should be located at the outer end hole of the inner arc surface of the panel. After the panels form a circular ring, all connecting bolts are temporarily not tightened to facilitate subsequent adjustments. Subsequently, install the eave baffles, eave connectors and the inner columns of the first section, and keep the column bolts in a pre-tightened state as well. Install the tie rods or reinforcing steel belts as per the design requirements, but they should be finally tightened after the roof frame of the warehouse is completed.
2.2 Installation of the roof frame of the warehouse
Place the top ring of the warehouse inside the enclosure board or on the central support, and install the beam according to the principle of symmetry. The upper and lower parts of the beam are respectively connected to the top ring of the silo and the column. For larger diameter silo bodies or temperature measurement beams, H-shaped steel structures are generally adopted. The temperature-measuring amplitude beams should be evenly distributed and symmetrically tightened through steel wire ropes. After the adjustment of the frame Angle is completed, all relevant bolts need to be tightened at one time.
2.3 Installation of the top cover plate of the warehouse
Before installation, the ventilation window should be fixed on the ventilation cover plate first and properly sealed. The cover plate installation adopts a “fan-shaped combination” method. Every two groups of cover plates form an installation unit and are installed on the beam in a cross or symmetrical sequence to disperse the cumulative error. The manhole cover plate should be installed simultaneously with the ladder on the top of the warehouse to ensure the safety of personnel passage.
2.4 Installation of other parts of the warehouse roof
Including the warehouse top cover, baffle, guardrail, ladder support and induced draft fan (optional), etc. When installing guardrails, it is necessary to leave passage space at manholes and ladders. All sealing parts must use rubber and plastic gaskets to ensure the overall rainproof performance of the warehouse top.

Part Three: Installation of the silo section
3.1 Silo Installation
Lift the already installed warehouse top and the first layer of enclosure panels as a whole through the hoisting frame, and install the enclosure panels layer by layer downward. The upper and lower panels must not be aligned, and the holes of the columns should be aligned. After each one or two layers of the enclosure panels are completed, the corresponding number of columns should be installed simultaneously, and the positions of the lifting rings should be replaced in a timely manner. All vertical joints and intersections of the panels must be treated with sealant putty. To minimize on-site risks, the COBAN 10,000 Bushel (280 MT) Intelligent Grain Bin is designed to be compatible with both crane-lifting and hydraulic jacking systems.
3.2 Installation of Warehouse doors
The silo door is usually installed at the position of the third layer of the panel from bottom to top. For large-diameter silos, a double silo door structure with upper and lower doors can be adopted. The door of the silo should be kept on the same vertical axis as the manhole on the top of the silo and the inner ladder to facilitate the entry and exit of personnel and maintenance.
3.3 Installation of internal and external ladders
The ladder climbing is carried out simultaneously with the installation of the silo. External ladders are generally installed with one section every two floors and are equipped with protective nets. The inner ladder is located directly beneath the manhole in the warehouse and is mainly used for daily inspections without a protective net. The ladder support needs to be equipped with sealing gaskets to prevent rainwater leakage.
Part Four: Installation of Other Components
4.1 Installation of the gantry frame and the roof support
When the project involves multi-silo systems and silo top conveying corridors, gantry cranes need to be installed. The gantry frame is fixed at the position with columns by connecting the curved plates, and the bolts are tightened uniformly after installation. For large-diameter silos or prefabricated corridors, intermediate supports on the silo top also need to be set up to enhance the overall rigidity.
4.2 Installation of the warehouse door platform
The platform of the silo door can be welded or assembled. It is strictly prohibited to be directly welded to the silo drum. It must be connected by bolts. The height of the platform, the spacing between the steps and the height of the guardrail must comply with safety regulations.
4.3 Installation of material level gauge
Level gauges are divided into two types: “full measurement” and “empty measurement”. The installation height should be determined in combination with the bin diameter and the flow characteristics of the material. It is usually arranged on the side of the inner ladder for easy maintenance in the future. The rotary resistance type material level gauge needs to be equipped with a guard plate, and the induction type material level gauge should maintain an appropriate distance from the surrounding plate.
Sealing Treatment at the bottom of the warehouse
After the overall installation of the warehouse body is completed and fixed to the foundation, anti-corrosion and sealing treatment at the bottom of the warehouse should be carried out. The enclosure panels within a range of approximately 200mm above the foundation should be painted with anti-corrosion asphalt paint. The space between the enclosure panels and the foundation should be filled with asphalt and sealed with cement on both the inner and outer sides. The outer side should be plastered at an outward slope to prevent water accumulation and leakage.
Step-by-Step Technical Guides:
- Read Part 1: TC Series Flat Bottom Steel Silo Installation Manual
- Read Part 2: Silo Body & Accessories Installation (Continued)
Conclusion
The installation of flat-bottomed steel silo is a systematic project. Any negligence in any link may affect the overall structural safety and service life. Strictly following the standard procedures for construction, controlling the torque of bolts, and attaching importance to sealing and safety inspections are the keys to ensuring the long-term stable operation of steel silos.
If you need more detailed installation guidance or technical support, please leave us a message below. Our business personnel are online 24 hours a day.
Website: https://www.cobansilo.com/
Mobile: +8615801054617
Email: info@cobansilo.com